Filename
2 Title: How to Automate
Frequently picture editors, stock distributors or others may not find your filenames to be very descriptive and may feel free to change them to best suit their own in-house needs. This might include renaming preview images that they have right-clicked or dragged down from your website, or even renaming files that you submitted as part of an assignment or for licensing as stock.
Even if they see your watermark, or know enough to read the metadata (File Info) and find your contact info, how can they tell you which image that they have in hand? Especially if it is one image from among a number of similars? This potential nightmare can be averted if you backup your filenames within your metadata. By making it a standard part of your workflow to embed your filename in the Title or Document Title field of your metadata, communicating the filename becomes a fairly simple process (once they know how to read the metadata in your file). If they don't have an application local to their device (like Adobe Bridge, or Photo Mechanic), have them try the Get IPTC Metadata or Jeffrey's Image Metadata Viewer sites.
The following sections include instructions or links to other instructions or resources that describe automated methods for writing your image filenames to the Title field of your IPTC metadata using the various applications mentioned. Note that some offer the option to only include the base filename, rather that the full filename with the extension. My recommendation would be to NOT include the file extension, as it's rarely necessary for identification.
Adobe:
Bridge
Adobe: Lightroom
Apple: Aperture
BreezeBrowser
Camera Bits: Photo Mechanic
FotoWare: FotoStation Pro
FotoWare: FotoStation LT
Hindsight: StockView and METAmachine
IDimager
ImageIngester
Phase One: Capture One
Phase One: Media Pro
Peter Krogh has a very useful script on a previous version of his DamUseful website called "Filename to Title" that will create a Bridge menu item that will enable you to write the Filename into the IPTC Title field. The following discussion on the Adobe User to User Forums shows the full code for the script above, as well as a way to modify it to only show the base filename (without extension). Another has a slightly different approach. The following page has suggestions if you want to only extract a portion of the filename and write to the Title field. Another script might be useful if you want to write the filename to the IPTC Keywords field.
There is nothing built in to Lightroom, however, the "Search Replace Transfer" plugin from John Beardsworth on the Photographers Toolbox site can be used to move the filename into the Title (or other) metadata fields. You can see the dialog for this operation in an article Beardworth wrote on "Complex File renaming" on his blog.
David Gordon has provided an Applescript that will enable you to write the Filename into the IPTC Title field in Aperture. At present these are only available to members of the Controlled Vocabulary forum, where they are stored in the Files area.
BreezeBrowser Pro uses a token based system to represent other values within the application. Here's how to have the filename automatically entered in the Document Title field for a single, or batch of images.
1. With BreezeBrowser running, Select any number of files within a folder, or just do a Select All (Control + A) for all files.
2. Right click and choose, Edit IPTC /XMP data or select this same option under the Edit menu (the keyboard shortcut is Control + Shift + I)
3. Paste one of the following named tokens into the Document Title field (including the "at" symbols before and after as shown).
| Token Name | What Token Shows | Example |
| @file@ | filename of the Image | IMG_001.JPG |
| @fileLower@ | Filename of the image in lower case | img_001.jpg |
| @fileNoExt@ | Filename of the image with no extension | IMG_001 |
| @fileNoExtLower@ | Filename of the image with no extension and lower case | img_001 |
4. Click on the Apply button if only writing the filename to a single image, or Apply to Selected button, if part of a batch operation
5. If you are applying to a number of files, you will see the Batch IPTC Settings dialog appear, and you need to indicate how you want to apply the changes.
You are about to change the IPTC values for two or more files. Please specify how the new IPTC values should be applied:
The default is to have the radio button selected to "Merge new values with existing values", and the three boxes in the lower section checked (as shown below).
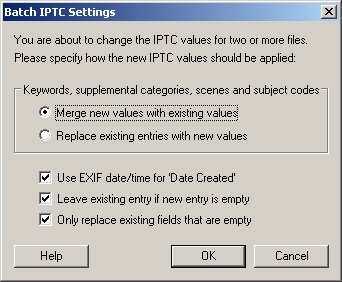
This seems to work fine for most uses, though you may wish to experiment with duplicate files until you are comfortable that all is working as you expect.
Camera Bits: PhotoMechanic (Mac/Win)
PhotoMechanic uses a "token" system, so all that's required is to place this renaming variable or token within the IPTC Stationary pad in Photo Mechanic to add the filename of the image to any metadata field embedded in the image.
Here's how to do this in a few short steps to an individual or selection of images.
1. In the thumbnail view, select the images in the folder for which you wish to add the filename to the Object Name field (Object Name is the same as the Title field in Photoshop). This can work for other fields as well, if you prefer to put the filename elsewhere.
2. Open the IPTC Stationary Pad, top item under the Image menu (on Mac the shortcut is Command + I).
3. Then put {filename} (including the squiggly brackets) within the field in which you want the current filename (including extension) to appear, such as drp041279097a.jpg. If you want the filename without the extension, use {filenamebase} instead, and you'll just get drp041279097a.
4. Check the "apply" checkbox to the left of the field, clear checks from any other fields for which you don't want to apply metadata, and then click on the Apply Stationary to Selected button to apply the IPTC Stationery Pad to the selected photos.
5. You'll see a status bar as PM goes to work.
FotoWare: FotoStation Pro (Mac/Win)
FotoStation Pro (not the LT version) has a "Metadata Macro" function which can be used to record any repeatable series of steps, such as inserting a token like the filename or the filename without extension. You can view a short video tutorial showing how to create this Metadata Macro with FotoStation Pro (no sound).
First, verify that the "Title" field is empty, unless you wish to create a macro that will replace an existing value in the IPTC Title field.
1. Under the "Stamp" icon choose the option to create
a "New Macro"
2. In the Panel dialog, give the macro a memorable name, such as "Copy
Filename to Title" by typing this into the "Macro name" field.
3. Click on the "Add field" button below the large white box.
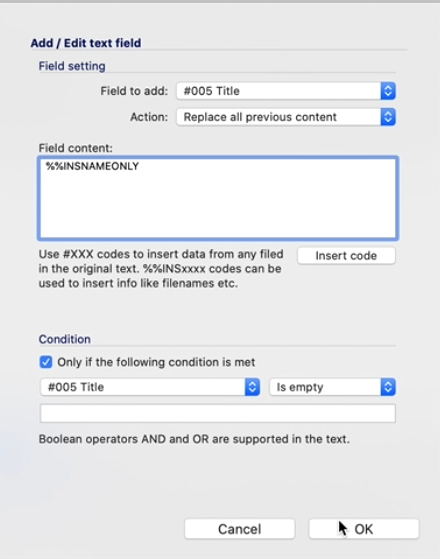
4. In the resulting "Add/Edit text field" dialog, click on the "Field
to add" pull-down menu, and choose the top most item "#005 Title".
5. Leave the "Action" field set to "Replace all previous content"
6. Below the "Field content" area, click on the "Insert code"
button.
7. In the resulting dialog, first switch the pull-down menu to "Image
file properties" if it not already selected. From the panel below, choose
the value labeled "File name without extension" (%%INSNAMEONLY)
and click OK. This should insert "%%INSNAMEONLY" into the "Field
content" area.
8. If you want this macro to work only if the Title field is
empty complete the following steps:
In the "Condition" section, leave the "Only if the following
condition is met" check box ticked. and change the pull-down menu that
has "Any Field" in it by default to "#005 Title" and change
the pull-down menu to the right reading "Contains" to "is empty"
and then click OK.
9. Back in the Panel dialog, click on OK to close.
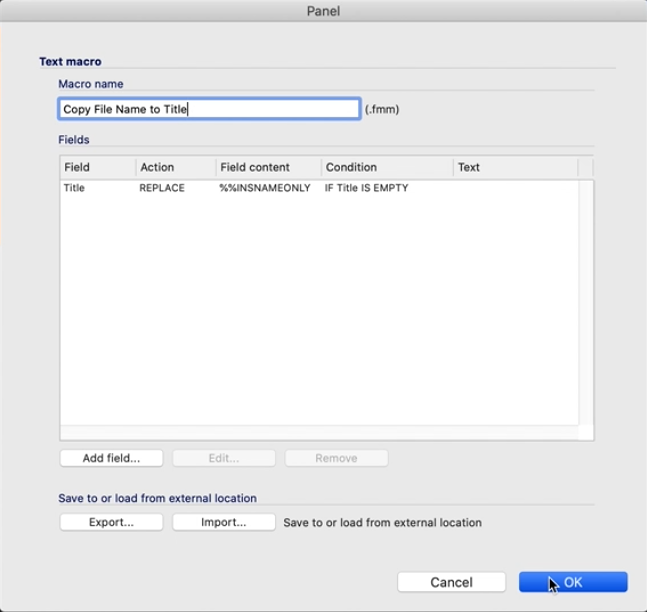
10. To apply to one or more images, select the image(s) you want to affect, and under the "Stamp" icon select the name of the macro you just created: "Copy File Name to Title" and release the mouse.

You can verify that the action has been completed, by opening a metadata template (Command/Control + T) that has the Title field available and check to see that the name of the file has been written into this field.
FotoWare: FotoStation LT (Mac/Win)
1. Click on the Stamp icon on the toolbar (shown above).
2. Select New template from the drop-down menu.
3. In the Title field enter %%INSNAMEONLY (for the filename without extension
- use %%INSFILENAME for the filename plus extension).
4. Save the template with a meaningful name (like Filename2Title or similar)
You can now select an image or images, and apply the metadata template by
clicking on the Stamp tool and selecting the named template you just created.
HindSight: StockView Catalogue & METAmachine (Mac)
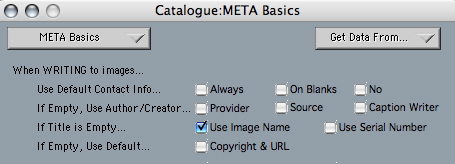
Both StockView and METAmachine have a radio button: If Title is Empty... Use Image Name. This option adds only the base filename, not the image extension, such as .jpg, or .tif. .
The button is the third item on the opening screen of METAmachine.
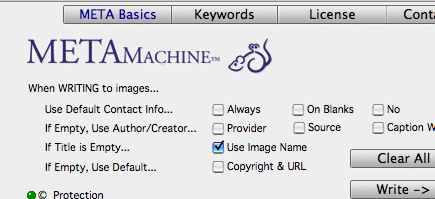
This is much the same for the metadata panels of the StockView Catalogue which offers the additional choice of using the Serial Number.
IDimager places the filename in the Title field by default, provided the field is empty.
To update the title manually you have to place a token into the Title field.
1. Select the thumbnail or thumbnails to which you wish to add
the filename to the Title field (or select all with Ctrl+A)
2. Open the Image Details panel (the pen icon in the far left of the Explorer
bar) or press Alt+Enter to open the Image Details dialog
3. In the Title field enter %FileName (for the base filename
only), or %FileName.%FileExtension (for filename + extension).
4. Click Apply
ImageIngester and ImageIngesterPro are pre-processing utilities that work with Adobe Bridge and Lightroom to copy images from your camera or card to your computer and to automate other important, steps in your workflow. In your ImageIngester template simply add {@filenameNew} to the IPTC Title field (also located in the Metadata>Content submenu). Check out the Macro Lab in the Tools menu of this utility for other useful macros.
The Mac version of Capture One uses Applescript, so it can be leveraged for this procedure. Henry Sautter provided the following script for Capture One which will set the Title (and the Original Filename field) to the file name. When you export the image file and include metadata the filename will show up in the Title field. You can verify by viewing the "File Information Display” in Apple Finder. Create a copy of the script in the Capture One script folder (Scripts Menu item). All selected variants will be processed by the script.
How to Install:
1) Select: Capture One... Scripts Menu... Open Scripts Folder
2) Select Mac Menu... Scripts... Open Script Editor.app and paste the script
(below) into a new script file and name it Title_filename
3) Save the new script in the Capture One Scripts Folder (Step one)
4) Select: Capture One... Scripts Menu... Update Scripts Menu
There should now be an option in the scripts menu to run the "Title_filename" script!
