
The Trouble
Transporting Tribbles
(or File
Verification using MD5 Checksums)
Anytime you move a data file (image or otherwise) there is
a chance it can be corrupted, with the result that you might not end up with
the same file with which
you started. This can happen due to a variety of reasons including failing
or faulty storage media, download or upload transmission errors, write errors
during local copying or moving, as well as bugs in computer software.
There are a couple of file transfer utilities, or synchronization
applications that may use some form of checksum or other operation to verify
file transfers. Utilities such as Chronosync or Synchronize! Pro X (Mac);
as well as SyncBack Pro, or Acronis (Windows) can be used to verify file
transfers, or to synchronize the files and folders between two different
computers. However these are only good for verification so long as the files
and folders for both sets stay in the same location. If you move a set of
files or folders from a working drive to an "Archive" server
because you want to get the files off the working drive, then all a verified
transfer
can do is
let you know that
the files
matched at that point in time. That is certainly useful, but once you remove
the files from the working drive, there is no way to tell if the files on
the archive have developed a problem or have been
changed
without opening them each to test.
Or can you?
The Checksum results (or hashes) created using the tools mentioned
below can be stored with the file for future reference; or used for other
purposes such
as discovering exact duplicates within an image collection. This flexibility
is part of their utilitarian beauty; but the best thing is peace of mind.
If that sounds intriguing, then read on to learn how you can create MD5
Checksums
using
free utilities
on
the
Mac
OSX
or Windows
platforms
to verify file transfers and much more.
Tribbles and Transporters
Let's start with an analogy as this may help understand
what we are trying to do. Pretend that each digital file you want to transfer
is a tribble --you
know,
those
cute
furry
animals
from Star Trek that all look alike -- and the "checksum" (such
as an MD5 checksum) is a DNA test to identify each tribble at the genetic
level.

A Maya rendering of a tribble, created by Clh288
Lets say you want to use the Star Trek teleporter to move
a bunch of tribbles from point A to point B (not necessarily a Klingon
ship,
but that is always
an option). To your eyes, and mine, all tribbles look alike and you can't
easily put a collar on them. So before you scatter their molecules across
space, you first run a DNA test for each. Then after they arrive at point
B, you round
each
of
them
up, and run the same test again. From comparing the results of the first
test with the second you can verify that each of the tribbles is the same
as the
one you started with. However, as this "verification," is
quite simple, all you learn is if the current test results match the
previous,
or if
they failed.
Of course you might also find that you have ten test results
from the first test, and only nine tribbles when you get to point b. If so,
you know that
you are missing one (and even which one). If that is the case, then that
probably means it's time to check the storage compartments or the engine
room.
Checksums are like DNA tests for your Files
Think of creating a checksum like running a DNA test
for your digital files. It gives you a way to easily check the integrity
of each file, or even
a folder full of files. Plus, at any
time in the future that you suspect something has happened to a file,
folder or drive, you can repeat
the test by comparing the current test with the one that was originally
done. If they match. Great. If they don't, then you know that you need
to dig deeper. If you find that files are missing, then you can start searching
for where they might have been accidentally moved (or deleted).
Your alternative is to inspect each file periodically and
make sure your software can open them. This serves as a check that they
have
not been corrupted,
or that the media is not failing. It's also possible to keep a spreadsheet
of the files in a given folder, or create an image catalog for each set
of images
in order
to make sure everything is intact. By periodically checking you could find
if a file was missing, but both of these methods will take more of your time,
and/or require some level of visual inspection, meaning you are less likely
to perform them on a regular basis.
If you are maintaining files in two locations that you
want to keep synchronized, then you might want to take a look at some
of the applications and utilities mentioned earlier; or check out something
called Rsync.
Checksum Overview
A checksum comparison is based on the simple premise that it is unlikely
that an accidentally damaged file will produce the same checksum as the
original file. Going back to the Star Trek Tribble analogy, if one of the
furry creatures was damaged by the transporter, then it's unlikely that
it's DNA signature would be the same after a problematic transport. If
we do a "DNA" check before and after each transfer, then we can
spot any problems right away, before they become bigger problems.
A "cryptographic" hash uses a special procedure
that takes an arbitrary block of data and returns a fixed-size bit string.
You
may not
understand that bit of geekspeak, however, it's not any more important to
know how this works than knowing about how gel electrophoresis works to understand
DNA markers. What you do need to know, is that in this instance, an MD5 checksum
(which is a form of cyptographic hash) created for each image can be stored
as a 32 character "string" and
the value is unlikely to repeat (it is not, however, impossible). For an in-depth
explanation of how an MD5 hash is computed, Makeuseof has a nice
one. If you want to see another way in which this works, play around with
this online
MD5
Hash Generator.
Due to the way in which they are created, any change (accidental
or intentional) to an image file will—in nearly all instances—change
the hash value that is created. For example, change the metadata for
an image, or retouch a blemish in the
pixels, and when you resave the file and create a new hash/checksum; it
should not match the
hash for the original file. It is possible, in some instances that an image
may have the same hash value generated, even though changes have occurred,
but this would be rare.
Likewise,
if there was a hard drive error, or a problem when a file was restored,
these changes to the file should
change it enough that the hash value will be different, and thus will
be noted as failures in your report. You should see these flagged as "bad" (instead
of OK) or some other type of "fail" notices in your report
or some type of feedback in the utility. [note,
I've received a few emails from others noting that there are some methods
that can be used to modify a document (typically text files) and then resave
it in such a way that the hash will match the earlier
version. This could be used by those wishing make changes which will
escape detection
on
a storage system.
However, in this example—where you are creating the hash
for a file or folder, then moving the file or folder, and then comparing
the hash values—it's unlikely that this type of tampering would come into
play].
An ideal "checksum" process should meet the following three tests.
Getting Started
While I know and can use"command line" interfaces,
I don't find them that easy to use, unless it's something I'm doing every
single
day. The specific instructions are quite picky and easy to bungle. Whenever
possible, I prefer a GUI (Graphical User Interface)
as I'm a visual
person,
and I find it easier to remember steps in a process when I can see what
is going on (check a box, select from a pull-down, etc.).
There are two programs I like that I'll use as illustrations.
I've looked at many more than these two. The others, which I've chosen not
to use, were either exceedingly difficult to install, are not intuitive in
how they work, or they have too many limitations.
Note, while I explain the process below while referring
to a folder of files, you can create checksums for individual files,
as well as folders, or folders of folders, up to and including entire
hard drives. The only difference will be in how long it takes to create
the list
of checksum values,
and how long it takes to verify a set of
files described in that list. You may find it easier to run some tests
with smaller "bite-sized" sets of files until you userstand the process
and get a feel
for
what can be
done.
Checksum+ for OSX
On the Mac OS X, I prefer to use a program called CheckSum+ (http://www.julifos.com/soft/checksum/index.html)
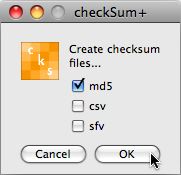
With this utility, all you have to do is drag and drop a
file, multiple files or a folder on the icon in the dock. When the dialog
pops up, make
sure that the checkbox next to the MD5 label is ticked, and an MD5 checksum
file will be created (CheckSum+ offers several options for the hashes --
there are check boxes for MD5 CSV, and SFV, but all you really need is
MD5). Since the Windows program I use also does MD5, the resulting files
are cross platform compatible.
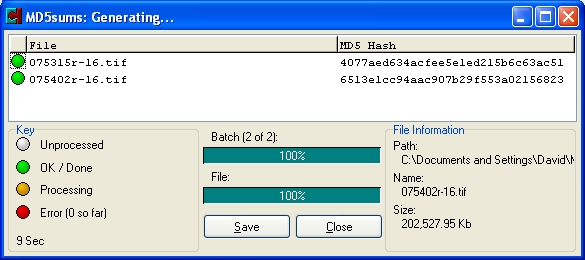
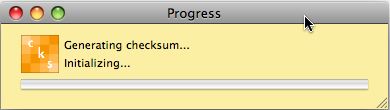
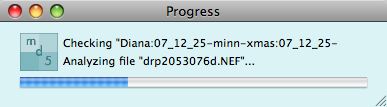
After you click the OK button, CheckSum+ goes to work. There
is a progress bar, but it only will show blue in the progress bar right
before it completes for some reason. If you choose a large folder, or a
drive
with
a number
of folders it may seem like the program has hung (without the infamous
"spinning pizza wheel of death" showing), so resist the urge to force quit.
If you are doing more than a couple hundred
files,
I would
advise finding something else to do, as it is likely to take a while.
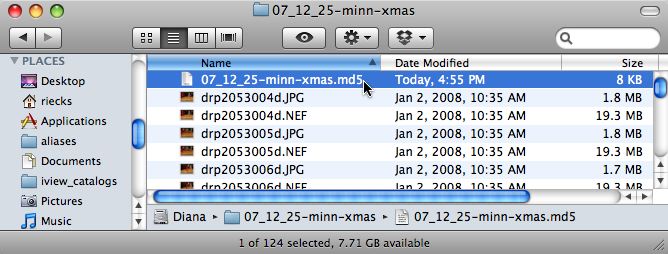
If you dragged
a folder onto the Checksum+ icon, then a checksum
text file (ending
in .md5) will be created at the folder level above the folder
you chose, and will have the same
name as the folder. Before you transfer the file,
drag this text
file (it will have the same name as the folder, but with an MD5 extension),
into the folder. If you are checksumming an entire drive, then store the
checksum file at the root of the hard drive.
If you are interested, you can open this text file in
a text editor, or import it into a spreadsheet. If you do, what you will
see are two
values,
separated
by some
blank spaces. The first
item is a 32 character string of numbers and letters (the "hash" or "checksum" value);
followed by some blank spaces, and then the filename (or the path and filename)
to which that hash is associated.
Here is an example showing a RAW file and its companion XMP sidecar.
dd33ffa352a74dd98471a4635a896e22 drp2112_030d.nef
f0190acf1e70e22057e5d8bde3939011 drp2112_030d.xmp
You can then transfer the folder containing the images and the newly created "Checksum" text
file using whichever method you prefer. This could be to your external drive,
file server, web server (you can even zip compress, then later download to
a different machine and unzip).
When you are ready to verify, simply open the folder, locate
the checksum file, and drag that file with the .md5 extension to the CheckSum+
icon in
the dock. In addition to MD5 files created by Checksum+ you can also drop
onto checkSum+'s icon any valid md5, sfv or cvs file (other types of checksums,
or verification files), and it will check for any files listed in
that text file.
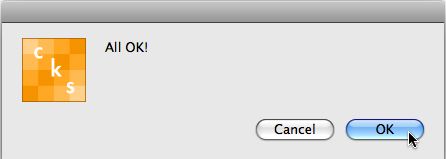
The utility will then create a new checksum for each file in the folder
and will then compare these to the values in the text file (the values from
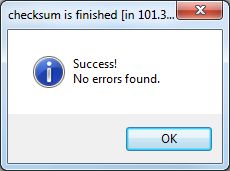
the original checksum process). If they all match, then you will simply see
a dialogue pop up stating "All OK."
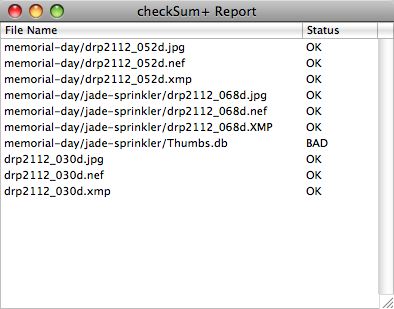
If even one of the files in
the folder doesn't match, then it will display a list of the names of all
the files in the folder, and indicate which are bad, or include a full list
of those that failed and those that were OK.
As a test, after first creating a checksum for a folder, try modifying the
metadata or color setting information in one of the files. After saving that
file drop the MD5 file from that folder onto the icon in the dock. The results
will vary depending on the application you use to make the changes. If you
make changes in the Raw file using Bridge or Adobe Camera Raw, then the comparison
should catch the change in the XMP sidecar, but the Raw file should show
as being untouched.
Issues with Hidden
Files on Mac OS X
One thing that does seem to happen is that CheckSum+ seems
to pick up the ".DS_Store" files that are hidden in the folder
if you select the folder, and/or go into the folder and "select all." So
long as you recognize that this is not one of your images and are not concerned
when it fails, that's not a big deal.
MD5Summer does Windows
For those on Windows, I would suggest taking a look at
MD5Summer (http://www.md5summer.org/)
As you might expect from it's name, this utility only creates and reads
MD5 checksums. This GUI based utility is not as "drag and drop" friendly,
but just about as easy to use. Instead of dragging and dropping a folder
on to the program icon, you launch MD5summer and navigate to the folder
you want to verify.
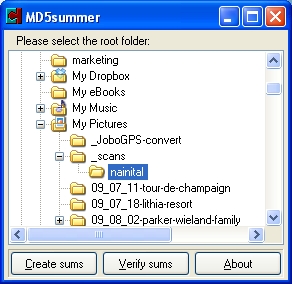
Once you have selected the folder, click on Create Sums.
Another dialogue will appear, where you can select the specific files to
be included.
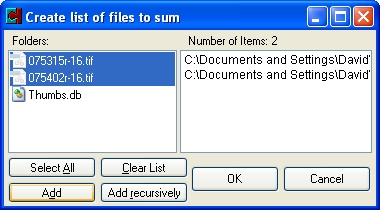
As MD5summer sees "everything" you may see some files
that are hidden by the OS, such as "thumbs.db" files which are
created by the Microsoft "Explorer" file/folder viewer. You can
use the "Select
All" button and then deselect those unwanted files by holding down
the Ctrl key while clicking on that file with the mouse. If you have sub-folders
you will need to click the "Add Recursively" button. Note that
if you do, that any "thumbs.db" files inside of those sub folders
are selected automatically. There is no option to remove those, so it's
easier to simply learn to just click "Select All" click "OK" and
learn to ignore those files when you run the verify.
Once you have your selection made, click on the "OK" button
and MD5summer goes to work.
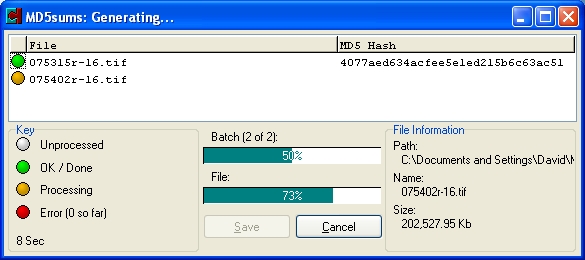
After it has computed the checksum values, it will
stop with a "Save As" dialogue and prompt you for what to name
the file and where to save the ".md5" text file. By default it
will automatically fill in the name of the folder and will save the file
inside the folder you originally chose. As that is what I want, I just click
on "Save" and I'm done.
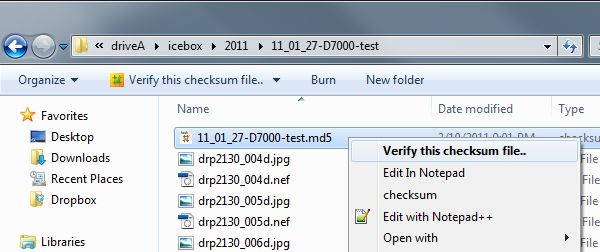
You can then transfer your files using your normal method.
To verify a folder just locate the ".md5" file
and right click and choose Verify with MD5summer from
the contact sensitive menu.
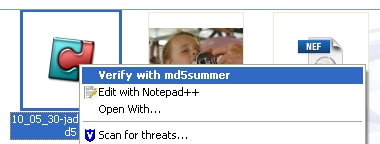
If even one of the images doesn't pass the verification test, you'll see
a red dot appear next to the file. Any of those that pass are green. If a
file doesn't verify, you'll see an error message such as, "There
was 1 error while processing. Do you wish to list errors."
If you respond by clicking "Yes" then
MD5summer simply moves all the failed files to the top of the list. If
you chose "No" then
all of the files stay in alpha order, including the name of the folder
if there are subfolders. Personally I find it easier to understand what's
going
on if they remain in alpha order, so I usually choose "No" at
this stage.
Other Windows
Options
Here are a couple of other Windows only options that are worth
investigating.
ExactFile
is a "File Integrity Verification Tool" that is much more "drag
and drop" friendly, built to take advantage of multi-core processors
and supports multiple checksum routines (MD5, SHA1, CRC32, RIPEMD). Since
the "drag and drop" feature eliminates a few steps, I've recently
switched to using ExactFile instead of MD5summer. It's a 1.0x "beta"
but seems to do all that MD5summer did and more, and much faster.
Checksum,
"a point-and-click sha1 and md5 hashing application for windows" from
Corz design (http://corz.org/windows/software/checksum/)
has a very small footprint and interface. Unlike MD5Summer, this program
does provide the option to simply right-click of a folder and choose the
option to Create Checksum and a file with the hashes will appear within
the chosen folder. To verify a checksum, just right-click on the MD5 or
other checksum (.hash) file and choose Verify this checksum file... from
the contact-sensitive menu.
In the extreme upper right-hand corner of your screen, you
will see a very thin bar noting the progress of the verification process.

At the conclusion, you will see a small dialogue noting your
success.
If there are missing files, or files that do not match the
previously created hash, the first indication of trouble is that the bar
in the upper-right corner will turn red.

And then you'll see a dialogue noting that an error log has
been created and the folder will open where that log was created.
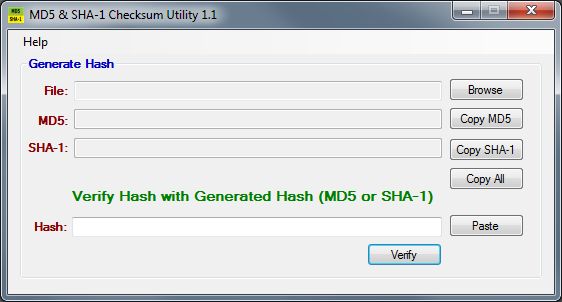
The MD5 & SHA1 Checksum Utility1.1 was
developed by Raymond Lin (http://raylin.wordpress.com/downloads/md5-sha-1-checksum-utility/)
and can be used to manually check the hash of programs downloaded from
the Internet, as well as generating and verifying checksums for folders
of files. The amazing thing is that the whole program is only 52k, and
doesn't require any installation. So just put a copy of the executable
on a USB Jump drive, and you can use it anywhere a Windows computer is
available.
Issues with Hidden
Files on Windows
On the Windows side, your "thumbs.db" files will
typically get recorded as well. As these will change as soon as you access
that folder
using Explorer, they will not pass verification.
As I primarily use MD5 checksums as a means of verifying
the file transfer of a single folder, I have one MD5 checksum text file
that I create for each folder. There are fewer things to check if you are
using the MD5summer application one folder at a time, especially if there
are no subfolders.
Notes on Cross Platform Compatibility
If you use this method for transferring a folder of processed
files to your "archive" then the MD5 checksum file can
be used for several purposes. As mentioned previously you can checksum
an entire drive, or a series of folders that contain subfolders as well.
While it is possible to do that for an entire drive, whether this is useful
or not depends on your goals and how often you modify files on that archive
drive. Keep in mind that for any given session, you will only create a
single checksum file, though it is possible to copy and paste parts of
the text file if you are inclined to tinker.
As the resulting checksum values are stored in a simple
text file, these can be used on either the Mac or Windows platform. There
are no problems using the MD5 generated by MD5summer (Windows) to
check a folder that had been transferred to a Mac and verified in CheckSum+.
However, if you use the MD5 Checksum file generated by Checksum+ (Mac)
to check
a folder that you have transferred to a Windows machine and verify
with MD5Summer you will probably encounter the following error message: "The
checksum file you have selected contains one or more ASCII generated sums
(for more info, visit http://www.md5summer.org/ascii/).
Ignore and continue?"

If you click on the OK button the validation will run and everything
works fine. This issue only concerns how the end of line return is being interpreted
by the local system. So the first time you see it you might be concerned;
however, as it doesn't affect the final result, you shouldn't worry.
Additional References
If you are still having trouble with the concept, this article
(and accompanying PDF) on
the topic of fixity from the Library of Congress blog might help.
Other Checksum
Uses
In addition to just verifying that the files you moved from
one drive to another are the same as the originals, you can use these same
(or newly created) MD5 checksum files for other purposes as well.
Check Removable Media "Health"
If you create back-ups of your
image files to CDR or DVDR, you can re-use the same MD5 file within each
folder, or package all of
the folders and files and create a new checksum file that can be stored
at the top level of the media. With the MD5 checksum text file right there
on the disc, you can accurately verify the integrity of your data right
after the burn, or at
any time
in the
future.If
you
suspect
that
your media may be failing, just pop the disc into a drive, and run a
verify on the MD5 file. If
you see one or more files fail, then it's time to move the rest of the
files to a safer location. Once you have transferred the files (and
the checksum file) to a new location, you can verify again to be sure
the rest of the files are intact.
Insure Files have not been tampered with
You can create a checksum and include it with image files that you place on your
website so that savvy clients can check to make sure that the file they download
is the intact original, and has not been tampered with by another party.
Locate Duplicate files
As checksum values are fairly unique you can compile various checksum reports
into a single spreadsheet and sort by hash values in order to identify possible
duplicate files on your drives and servers. This topic was worthy of it's
own article, which you can view at "Which One
of These Is Not Like the Others?: or Using Checksums to Deduplicate Image Collections." For
other related articles, check the What's New page, or stay tuned to posts on Twitter,
or the ControlledVocabulary
Forum] if you are interested.
Many thanks to Roger Howard, Alberto
Mateo, Said Nuseibeh and Tony Schutz for their assistance in proofing and
testing the suggestions in this article.
Initially posted: July, 2010, last update, December
30, 2016.